Showing posts with label Tutorials. Show all posts

Mac Tricks

0 comments


This is a video that I made myself. It will show you some cool Mac shortcuts and tricks. These will work on most apple computers. There is also one more trick that I would like to share. It is a screenshot for the whole screen or just a selected part. To do a full screen shot: hold command, shift, and 3 at the same time. This will take a full screenshot and save it to your desktop. Then the next one is a selected screenshot. To do this hold command, shift, and four at the same time. Then a new arrow will come up. Select what you want with it and then click.


[get this widget]

Adding a Printer to Your Computer

0 comments


This article will tell you how to add a computer, so that when you want to print to a printer in a program such as Microsoft word, the printer will show up in the printers drop down menu. First click start and then go to settings and click on printers and faxes or just printers. Then a screen will come up, click on add printer. Then the add printer wizard will come up. Then two options will come that say add local or network printer. If your printer is hooked up directly to your computer, click local, if it is over a network click network printer. If you click local printer it will automatically detect your printer or you can select it manually in the list that comes up. now if you hit network printer, it will ask you to type the name of your printer or hit next to browse. you can try typing the name of the printer but if you don't know it select next and then you can browse for a printer in your domain. Click on your domain and then a printer should show up under it. Click on it and hit next. Then it will also ask you to make it your default printer you can click yes or no. If you click yes it will automatically show up when you hit print and if you hit no you will have to choose it from the drop down menu. Finally click finish  and then your printer should be added to the list of printers and you can print from it.

[get this widget]

Backing Up Your Hard Drive

0 comments


This will help you copy all of your important files so they are not lost if your computer breaks or if you need to reformat your hard drive. You have a few ways that you can backup your data. You can save them to a flash drive, floppy, burn them to a disk, or an external hard drive.  The two best ways to do this are by burning your information to a disk or saving it to an external hard drive. This is because you can store many files on a hard drive and disk. To burn a disk you need to have a cd burner and dvd read write disks. Now once or if you have these, you can burn a disk. First make a folder and find all of your important files and drag them into the folder. make sure you have all of your important data in this folder. you can make additional folders inside of this folder to organize your data. Now open up the program that came or works with you cd burner. Make the program burn files. After this it will ask you to select the files you want to burn. Select your folder with all of the information in. Then put your cd in the burner and click burn. Once it is done check your disk to make sure that everything is on it. To check it, go to my computer and click on your (D:) drive and this will open your cd. Now to save your information on an external hard drive you need to have an external hard drive connected to your computer or on your network. Now make a folder with all of your important data in it. Then once you do that, right click on the folder and hit copy. Then find your external hard drive and click on it. Then paste your folder inside the hard drive. Then double check that it copied the folder and that everything is in there. Now to save your folders to a flash drive or floppy make the same folder with everything in it and copy it to your device. Now after you have backed up everything you are ready to reformat your computer if you want to. Also you will have copies of all of your files so you will not lose them if you have a computer problem.

[get this widget]

Sharing Files Over a Network

0 comments


This is article will tell you how to share things on a network. You need to make sure you are connected to a network by clicking on my network places. Then click on your network and it will show all of the computers on your network and if this happens you are connected. Then you have to find what you want to share on the network. If it is a hard drive go to my computer and right click on the hard drive that you want to share. Then a menu will come up and you have to select properties. Then  a window will pop up that has information on your hard drive. Then there will be tabs on the top of the page such as general, tools, hardware, sharing, security, and quota. Click on sharing and it will say do not share this folder or share this folder. click on share this folder. Then under it you can create a name for the share. this name will show up when you find your share on the network. You don't have to leave a comment on it if you don't want to. Then under that there is an option that will limit the people that can use the file at the same time. Just click maximum allowed. Then hit apply. Then when you go to your hard drive again you will see a hand under your hard drive icon and this means that it is being shared on the network. To access this folder from the network click on my network places and then click on entire network. Then hit show entire contents if nothing is displayed. Then an icon will come up that will say Microsoft windows network. Click on this and then click on your domain icon. then click on the computer that it is being shared from and then you will see the share folder you created. click on it to open it. With this you can access all of the files on this hard drive from any computer on your network. But be warned anyone on your network can access this file so be careful what you share. Now this is how to share a folder on your network. To share a folder make a new folder and then drag all the files that you want into it. Then right click on it and hit properties. You will set this share up the same way you did for your hard drive. Now when you set up a disk drive such as your (D:) drive, which is the drive where you put your cd's in you will share it the same way as before but this time when you access it, whatever cd you have inside your drive will show up on the network and people can actually run the cd from another computer over a network. This is how to create shares. I hoped this helped and I hope you enjoyed this!

[get this widget]

De-Fragmenting Your Computer

0 comments


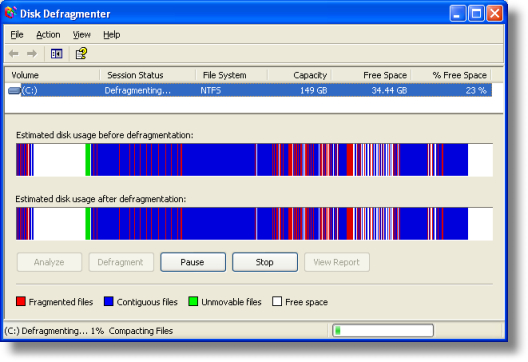
This article will tell you how to de-fragment your computer. When you de-fragment your computer it fixes corrupt files, folders etc.. It will also speed up your computer a little bit. If you haven't done this in a long time or its your first time it will probably take a long time so do this at night or when you don't need to use your computer. So first you have to click on the my computer icon on your desktop. Then go to your local disk (C:), (E:), or whatever it is named. It is sometimes different for other computers but most of the time it will be named (C:). Then you want to right click on it and a menu will come up. Then you want to click on properties. Then a window will come up and it will show the space on your hard drive. There will also be tabs on the top of the window that say general, tools, hardware etc.. Click on the tools tab and then 3 options will come up. Then go and click de-fragment now. Then click on the volume you want to de-fragment. EX. (C:). Then click on de-fragment and it will start the process. While it is de-fragmenting you don't want to use the computer because it will slow down the process and sometimes it will have to restart. So once it is done your computer should run a little faster and files and folders should open a bit quicker.

[get this widget]